
Easy Low-Carb Protein Cheesecake Jars (No-Bake Meal Prep)
Description
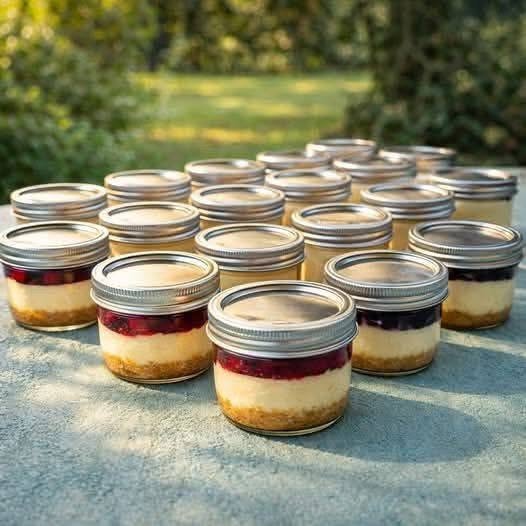
Indulge in a velvety, rich dessert that satisfies sweet cravings without derailing your fitness goals. This no-bake cheesecake in a jar layers a buttery, spiced almond flour crust with an ultra-creamy, tangy filling whipped from Greek yogurt and light cream cheese. Naturally low-carb and packed with quality protein, it gives you the classic bakery-style decadence you love in a perfectly portioned, macro-friendly format.
Can This High-Protein Cheesecake Support Weight Loss Goals?
Yes, this recipe supports weight loss primarily through satiety and portion control. High-protein foods take longer to digest, which helps release fullness hormones and curb cravings between meals. By replacing refined sugar and heavy graham cracker bases with zero-calorie sweeteners and almond flour, this recipe keeps net carbs low, minimizing blood sugar spikes and subsequent energy crashes that often trigger overeating.
Does High-Protein Cheesecake Fit a High-Protein Lifestyle?
This recipe fits seamlessly into a high-protein diet by delivering over 20 grams of protein per serving while keeping net carbs well under 6 grams. Made with strained Greek yogurt, whey isolate, and reduced-fat cream cheese, every layer is structured around protein density rather than empty carbohydrates. It serves as an efficient post-workout treat or a macro-friendly snack that helps you consistently hit daily protein targets without exceeding your calorie budget.
My Personal Experience
-
The Greek yogurt strain step made the texture indistinguishable from traditional New York cheesecake.
Draining the whey for an extra twenty minutes eliminated the watery layer entirely, giving the filling an ultra-dense, bakery-quality consistency straight from the fridge.
-
Adding cinnamon to the toasted almond flour base eliminated the raw nut aftertaste completely.
A quick dry-toast in the skillet created that authentic baked graham cracker warmth, making the base taste far richer than a standard raw nut crumble.
-
Switching from plant protein to a whey-casein blend prevented the mixture from turning chalky or dry.
Casein absorbs moisture evenly alongside the cream cheese, which keeps the filling glossy, spoonable, and smooth throughout several days of chilling.
Perfect For:
-
High-Protein Desserts: A satisfying evening treat that hits sweet cravings while helping you reach daily macro goals.
-
Low-Carb & Keto Lifestyles: Uses an almond flour crumble and keto-friendly sweetener to keep net carbs minimal.
-
Make-Ahead Breakfasts: Pre-portioned mason jars offer a grab-and-go morning meal loaded with slow-digesting protein.
-
Post-Workout Fuel: Provides rapid recovery nutrition through quality dairy proteins paired with minimal fats.
Why You’ll Love This Recipe:
-
Zero Oven Time Required:
The crust toasts quickly on the stovetop, and the filling sets purely through refrigeration, keeping prep effortless and heat-free.
-
Customizable Single-Serve Portions:
Layered in portable mason jars, each serving is pre-measured to stop mindless snacking and make weekly meal planning foolproof.
-
Uncompromising Thick Texture:
The combination of whipped cream cheese and protein powder mimics a baked custard consistency without requiring a water bath.
Common Mistakes to Avoid:
-
Using Cold Cream Cheese: Cold cream cheese causes persistent, tiny white lumps; always bring it to true room temperature so it whips smoothly into the yogurt.
-
Using High-Lactose Liquid Yogurts: Runny regular yogurt makes the filling soupy; use whole or 2% strained Greek yogurt (or skyr) with the liquid whey drained off.
-
Overpacking the Almond Crust: Pressing the toasted crumbs down with too much force compacts them into a rock-hard puck once chilled; pack lightly with the back of a spoon.
-
Skipping the Chill Time: Eating immediately results in a soft pudding; allow at least two hours in the fridge so the fats stabilize and the protein powder fully hydrates.
Required Equipment:
-
Electric Hand Mixer: Whips the softened cream cheese and protein powder into a lump-free, aerated texture.
-
8-Ounce Mason Jars: Provides airtight, pre-portioned single servings that keep the layers clean and fresh.
-
Small Skillet: Toasts the almond flour crust evenly in under three minutes without heating the oven.
-
Silicone Spatula: Scrapes the dense cream mixture efficiently from bowl sides to prevent wasted batter.
Storage Instructions:
-
Refrigerator: Seal the jars tightly with their two-piece lids and store them in the coldest section of your fridge for up to 5 days. Keep any fresh fruit toppings separate until just before eating to preserve texture.
-
Freezer: Freeze jars without fresh toppings for up to 1 month; use freezer-safe wide-mouth glass jars and leave 1/2 inch of headspace. Thaw overnight in the refrigerator before serving to preserve the smooth emulsion.
Recipe Details
-
Preparation Time: 15 minutes
-
Cooking Time: 3 minutes (stovetop crust toast)
-
Total Time: 18 minutes (plus 2 hours chilling)
-
Servings: 2 jars (8 oz each)
-
Best Season: All-season
-
Total Calories (Per Serving): Approximately 285 calories
A velvety, macro-balanced treat layering toasted cinnamon-almond crust with rich, protein-whipped cream cheese.
Prepared in under twenty minutes with zero baking, it sets into a dense, spoonable classic cheesecake texture.
Naturally low-carb and free of refined sugar, this single-serve jar makes hitting daily fitness macros delicious.
📝 Ingredients:
For the Crust:
-
1/2 cup (56g) superfine blanched almond flour
-
1 tbsp (14g) unsalted butter, melted (can swap with melted coconut oil)
-
1 tbsp (12g) granular erythritol or monk fruit sweetener
-
1/4 tsp ground cinnamon
-
1 pinch fine sea salt
For the Cheesecake Filling:
-
4 oz (112g) light cream cheese (Neufchâtel), softened to room temperature
-
3/4 cup (170g) plain non-fat or 2% Greek yogurt (strained well of any liquid whey)
-
1 scoop (30g) vanilla whey-casein blend protein powder (pure whey can be used, but casein provides a thicker set)
-
2 tbsp (24g) powdered zero-calorie sweetener (powdered blends dissolve best without grittiness)
-
1 tsp pure vanilla extract
-
1 tsp fresh lemon juice (enhances the natural cheesecake tang)
Optional Garnish:
-
2 tbsp fresh raspberries or sliced strawberries (approx. 1 tbsp per jar)
Directions:
-
Toast the Crust (Medium-Low Heat, 2–3 Minutes): Place the almond flour, melted butter, granular sweetener, cinnamon, and salt in a small non-stick skillet over medium-low heat. Stir constantly with a spatula for 2 to 3 minutes until the crumbs turn a light golden brown and smell fragrant. Remove immediately from heat to prevent burning, divide evenly between two 8-ounce mason jars, and tap down lightly with the back of a small spoon. Set aside to cool.
-
Cream the Base (Low to Medium Speed, 2 Minutes): In a medium mixing bowl, beat the room-temperature cream cheese with an electric hand mixer on medium speed until completely smooth, glossy, and free of lumps.
-
Incorporate Protein & Liquids (Medium Speed, 1–2 Minutes): Add the Greek yogurt, vanilla protein powder, powdered sweetener, vanilla extract, and lemon juice to the bowl. Beat on low speed until the powder is incorporated, then increase to medium for 60 seconds until the mixture is thick, uniform, and lightened in texture. High-protein tip: Do not overmix at high speed, which can incorporate excess air and cause the filling to deflate or separate while chilling.
-
Assemble the Jars: Spoon the cheesecake filling evenly over the cooled crust in each jar, smoothing down the tops with the back of an offset spatula or damp spoon.
-
Chill to Set (2 Hours Minimum): Seal the jars with airtight lids and refrigerate for at least 2 hours (or overnight) to allow the casein and dairy fats to solidify into a firm, sliceable cheesecake consistency. Top with fresh berries just before serving.
Nutrition Facts (Per Serving – Approximate):
-
Calories: 285 kcal
-
Fats: 17 g
-
Cholesterol: 42 mg
-
Sodium: 280 mg
-
Potassium: 220 mg
-
Total Carbohydrates: 8 g
-
Fiber: 3 g
-
Net Carbs: 5 g
-
Sugars: 4 g
-
Protein: 24 g
-
Calcium: 180 mg
Notes:
-
Storage & Prep: Keep sealed jars refrigerated for up to 5 days; add any fruit or berry purees on the day of consumption to avoid making the top layer soggy.
-
No Reheating: This is a cold dessert and should be served directly from the refrigerator; heating will cause the yogurt emulsion to separate and break.
-
Allergy Adaptations: To make nut-free, replace the almond flour with an equal amount of ground sunflower seed meal or crushed low-carb seed crackers. For dairy-free needs, use firm dairy-free cream cheese, plain coconut yogurt, and plant-based protein powder (though nutritional macros will shift).
-
Flavor Boosts: Stir 1 tablespoon of unsweetened cocoa powder into the filling for a chocolate version, or fold in 1 tablespoon of zero-sugar lemon curd before chilling for extra citrus brightness.
Frequently Asked Questions:
-
Can I use regular full-fat cream cheese instead of light cream cheese?
Yes, regular cream cheese works cleanly and yields an even richer texture, though it increases the total fat and calorie count per jar.
-
Why is my cheesecake filling runny?
A runny filling usually means the yogurt contained excess liquid whey or a purely liquid plant-based protein powder was used without enough resting time.
-
Can I substitute plant-based protein powder for whey?
Yes, but you will need to add 1 to 2 tablespoons of unsweetened almond milk, as plant proteins absorb significantly more liquid than dairy blends.
-
How far in advance can I make these jars?
You can make these jars up to 4 days ahead of time, keeping them tightly lidded in the refrigerator until ready to eat.
-
Can I make this recipe completely nut-free?
Yes, substitute the almond flour crust with toasted rolled oats (if carbs allow) or ground raw sunflower seed meal.