
Home-Canned Cheddar & Colby Spread: High Protein, Low-Carb Pantry Staple
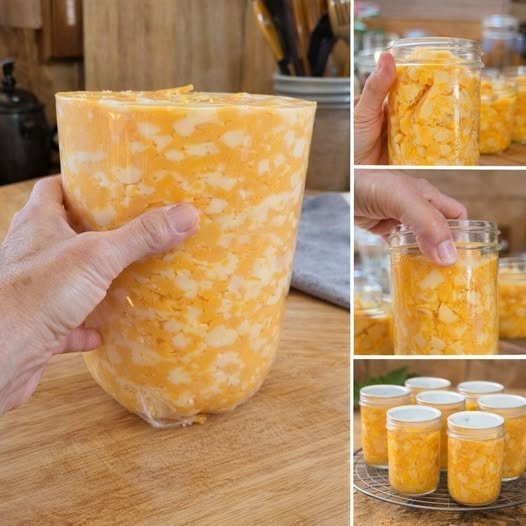
Description
There is nothing quite like opening a fresh jar of rich, velvety cheese spread that carries the sharp tang of aged cheddar balanced by the mild, creamy buttery notes of Colby. When gently melted and heat-processed into smooth, spreadable jars, this homemade preserved cheese delivers a luscious, slice-and-spread texture that instantly elevates quick meals. Because it naturally relies on whole dairy, this recipe acts as an exceptional high-protein, low-carb solution for preppers, keto enthusiasts, and busy home cooks looking to keep nutrient-dense, satiating foods on hand without relying on store-bought fillers.
Can This Canned Colby / Cheddar Cheese Support Weight Loss Goals?
Yes, this canned cheese spread can effectively complement a balanced weight-loss plan centered around satiety and macronutrient balance. Cheese is naturally dense in high-quality dairy protein and dietary fats, a combination known to slow digestion and stimulate satiety hormones, helping to keep hunger and between-meal cravings at bay. By replacing heavily processed, carb-laden spreads with a zero-added-sugar, low-carb cheese foundation, you get concentrated flavor and long-lasting fullness without spiking blood sugar or derailing daily caloric targets.
Does Canned Colby / Cheddar Cheese Fit a High-Protein Lifestyle?
This canned Colby and cheddar recipe is an ideal fit for anyone prioritizing a high-protein, ketogenic, or low-carb lifestyle. Composed entirely of whole cheddar, Colby, and minimal emulsifying liquids, each serving provides around 7 grams of protein paired with under 1 gram of net carbs. The dairy proteins—chiefly casein and whey—deliver a complete amino acid profile to support lean muscle preservation and recovery. With virtually zero refined starches or fillers, it delivers pure, functional dairy nutrition directly suited for strict low-carb and high-protein dietary protocols.
My Personal Experience
-
Consistent Texture Batch After Batch:
Whisking continuously over a gentle double boiler prevented the cheese fats from separating into grease pools. The resulting spread cooled into a uniform, sliceable block inside the jar that melted smoothly when reheated.
-
Flawless Jar Sealing and Storage:
Wiping the jar rims with white vinegar before placing two-piece canning lids guaranteed airtight vacuum seals every single run. Storing the sealed jars in a cool, dark larder kept the cheddar flavor sharp and tangy over several months.
-
Instant Protein Boost for Meal Prep:
Having pre-portioned half-pint jars readily available cut down my daily low-carb snack prep time to under a minute. Scooping a tablespoon onto celery sticks or warm protein patties kept me satisfied through long work afternoons.
Perfect For:
-
High-protein, low-carb snacks: Ideal for dipping raw bell peppers, celery, or zucchini rounds.
-
High-protein breakfast prep: Melts instantly over scrambled eggs, omelets, and breakfast sausage patties.
-
Keto and carnivore diet plans: A high-fat, ultra-low-carb fat source and topping for bunless burgers and steaks.
-
Emergency pantry readiness: Reliable, shelf-stable comfort food crafted without artificial stabilizers or food starches.
Why You’ll Love This Recipe:
-
Rich, Dual-Cheese Flavor Profile:
Combining sharp cheddar with mellow Colby delivers a perfectly rounded savory tang that outperforms single-cheese spreads.
-
Minimal Clean Ingredients:
You retain full control over your food by skipping artificial food colorings, processed vegetable oils, and chemical preservatives.
-
Naturally Zero-Carb Friendly:
Every serving yields negligible carbs, allowing you to hit strict macros effortlessly while enjoying real melted dairy.
-
Convenient Grab-and-Go Format:
Packaging into individual half-pint canning jars creates pre-measured, portion-controlled servings ready for busy weekdays.
Common Mistakes to Avoid:
-
Applying Direct High Heat: Heating shredded cheese over direct stove heat causes dairy proteins to seize, yielding a grainy, separated pool of oil. Always use a gentle double boiler or water bath.
-
Using Pre-Shredded Bagged Cheese: Pre-packaged shreds contain anti-caking starches (such as cellulose or potato starch) that hinder smooth emulsification and add unwanted carbohydrates. Always shred your own blocks.
-
Dirty or Greasy Jar Rims: Allowing even a microscopic smear of cheese oil on the glass rim prevents canning lids from forming a dependable hermetic vacuum seal.
-
Skipping Gentle Agitation During Cooling: Leaving the jars completely untouched while hot can cause the heavier solids to settle; gently inverting or swirling the cooling jars once or twice keeps the texture uniform.
Required Equipment:
-
Double boiler (or heatproof bowl over a saucepan): Ensures indirect, gentle heating to melt cheeses smoothly without scorching.
-
Silicone spatula and wire whisk: Blends melting cheeses and prevents scorching at the pan base.
-
Half-pint (8 oz) glass canning jars with new lids and rings: Sized for single-batch freshness and reliable vacuum-seal formation.
-
Canning funnel and jar lifter: Keeps hot cheese off the jar rims and ensures safe transfer into and out of the water bath.
-
Water bath canner or deep stockpot: Generates the necessary heat to seal canning jars and maintain pasteurization temperatures.
Storage Instructions:
Store sealed, cooled jars in a cool, dark, dry pantry cabinet (50°F–70°F) where they will stay fresh and flavorful for up to 12 months. Once a jar’s vacuum seal is popped, transfer it directly to the refrigerator; store in the sealed jar with the lid tightly screwed on and consume within 2 to 3 weeks to preserve freshness and protein quality. Freezing whole glass jars is not recommended due to expansion risks, but you can freeze the spread in airtight freezer-safe silicone molds or containers for up to 3 months (thaw overnight in the refrigerator; a gentle stir restores texture).
Recipe Details
-
Preparation Time: 15 minutes
-
Cooking Time: 25 minutes
-
Total Time: 40 minutes (plus cooling time)
-
Servings: 16 servings (makes approximately two 8-ounce / half-pint jars; 2 tbsp per serving)
-
Best Season for This Recipe: All-season
-
Total Calories (Per Serving): Approximately 115 kcal (approximate estimate)
Short Description
This homemade canned Colby and cheddar cheese spread delivers a deeply satisfying, velvety melt packed with natural dairy protein. Hand-grated whole cheeses are gently melted and water-bath sealed in convenient half-pint jars for effortless storage. It offers a low-carb, pantry-ready essential ideal for low-carb cooking, snacking, and quick meal prep.
📝 Ingredients:
-
8 oz (225g) Sharp Cheddar Cheese: Freshly grated from a block (Note: Opt for block cheese; avoid pre-shredded varieties coated with anti-caking starches).
-
8 oz (225g) Colby Cheese: Freshly grated from a block (Note: Mild, high-moisture Colby provides creaminess to balance the cheddar).
-
½ cup (120ml) Evaporated Milk or Unsweetened Heavy Cream: (Note: Heavy cream keeps carbs lowest; evaporated milk yields a slightly firmer spread).
-
1 tsp (5g) Sodium Citrate: (Optional but recommended: A natural food-grade melting salt that guarantees an ultra-smooth texture without oil separation).
-
¼ tsp Ground Mustard Powder: (Optional: Enhances the natural sharpness of the cheddar without adding distinct mustard flavor).
-
¼ tsp Salt: (Adjust to taste depending on the saltiness of your cheeses).
Directions:
-
Sterilize and Prep Jars:
Place two clean 8-ounce (half-pint) canning jars and their metal bands in a water bath canner filled with simmering water. Keep warm until needed. Wash new canning lids in warm, soapy water.
-
Dissolve Emulsifiers (Gentle Heat):
Set up a double boiler over medium-low heat with 1–2 inches of simmering water in the bottom pan. Pour the evaporated milk (or cream), sodium citrate, salt, and ground mustard powder into the top bowl. Whisk until the liquid is steaming and the sodium citrate has completely dissolved (2–3 minutes).
-
Melt the Cheeses (Low Heat & Constant Stirring):
Reduce stove heat to low. Add the freshly grated Colby and Cheddar cheese in small, gradual handfuls. Whisk continuously after each addition. Allow each batch to melt completely into the sauce before adding the next.
High-Protein Cooking Tip: Keep the temperature below 150°F (65°C); overheating denatures delicate milk proteins, forcing dairy fat to separate into a greasy layer.
-
Monitor Texture & Visual Cues:
Continue gently folding with a silicone spatula for 4–5 minutes until the cheese sauce turns glossy, silky-smooth, and thick enough to coat the back of a spoon with zero visible shreds or lumps.
-
Ladle into Warm Jars:
Remove warm jars from the water bath and drain thoroughly. Using a canning funnel, ladle the hot, melted cheese into the jars, leaving ½ inch of headspace at the top to allow for thermal expansion.
-
Clean Rims & Seal:
Dampen a clean paper towel with white distilled vinegar and thoroughly wipe the rims and threads of each jar to remove any traces of dairy oils. Center a lid on each jar and screw the band down until fingertip-tight.
-
Process in Water Bath (Gentle Simmer):
Lower the filled jars onto the rack of your water bath canner, ensuring jars are covered by at least 1 inch of hot water (approx. 180°F–185°F). Process half-pint jars at a gentle simmer for 15 minutes to establish a vacuum seal and uniform heat penetration.
-
Cool and Inspect Seals:
Using a jar lifter, remove the jars onto a wooden board or towel-lined counter, leaving 2 inches between them. Allow to cool undisturbed for 12–24 hours. The cheese will firm up into a smooth, spreadable block. Listen for the audible “pop” indicating successful vacuum seals; check that lid centers are curved downward and firm to the touch before labeling.
Nutrition Facts (Per Serving – Approximate):
(Serving Size: 2 Tablespoons / ~28g)
-
Calories: 115 kcal
-
Fats: 9.5 g
-
Cholesterol: 30 mg
-
Sodium: 220 mg
-
Potassium: 35 mg
-
Total Carbohydrates: 0.8 g
-
Fiber: 0 g
-
Net Carbs: 0.8 g
-
Sugars: 0.6 g
-
Protein: 7.0 g
-
Calcium: 200 mg
Notes:
-
Storage Tips: Store intact, sealed jars in a dark, temperature-stable pantry away from sunlight. Once opened, always refrigerate and use a clean utensil for each serving to avoid introducing bacteria.
-
Reheating Instructions: Scoop desired portion into a microwave-safe dish and warm in 15-second intervals on 50% power, or warm gently in a small skillet over low heat until melted.
-
Allergy Notes: Contains dairy (milk, cheese). Gluten-free, nut-free, and egg-free.
-
Flavor Boosts: Stir in ¼ tsp of smoked paprika, garlic powder, finely diced pickled jalapeños, or chipotle powder during Step 3 for a zesty nacho-style finish.