
Easy Low-Carb Artisan Sourdough Loaf Pan Recipe
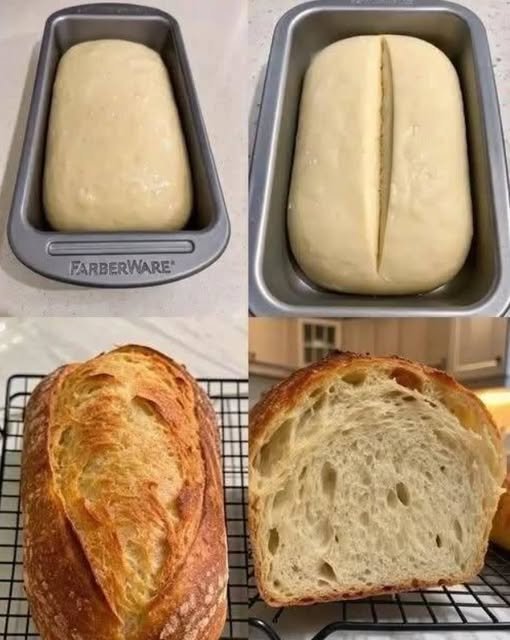
Baking rustic sourdough does not require a round proofing basket or an expensive cast-iron combo cooker. This loaf pan method yields uniform sandwich-ready slices boasting a golden, blistered crust, an airy, chewy crumb, and that classic wild-fermented tang. By naturally fortifying the dough with vital wheat gluten and protein-dense seeds, this bake delivers a satisfying, high protein staple that keeps net carbs lower than standard white boules while fitting seamlessly into mindful, low-carb-friendly meal planning.
Can This High-Protein Artisan Sourdough Bread Support Weight Loss Goals?
This loaf supports satiety-driven weight management by replacing empty starch calories with structural plant protein and slow-digesting dietary fiber. Traditional white breads trigger sharp blood-sugar spikes followed by hunger crashes, whereas long sourdough fermentation pairs with concentrated gluten and seeds to blunt the glycemic curve. The sustained fullness from each protein-rich slice curbs mid-day snacking, making calorie control effortless without eliminating real bread from your routine.
Does High-Protein Artisan Sourdough Bread Fit a High-Protein Lifestyle?
Yes, this recipe is formulated specifically to integrate into a performance-focused, high-protein lifestyle by delivering 11 grams of protein per standard slice. Pairing active sourdough starter and unbleached bread flour with pure vital wheat gluten and chia seeds keeps net carbs moderate around 16 grams while doubling typical bread protein levels. The extended cold fermentation also pre-digests gluten peptides and starches, maximizing nutrient bio-availability and gut comfort. It serves as an optimal muscle-repairing foundation for egg toasts, lean deli sandwiches, and post-workout fuel.
My Personal Experience
-
Effortless Uniform Sandwiches: Baking inside a standard loaf pan forces the dough vertical, eliminating flat spreading and creating uniform, sturdy sandwich slices. This structural support makes slicing clean and even, allowing toppings to stay put without falling through irregular, wide holes.
-
Streamlined Steam Trapping: Inverting a second metal loaf pan over the base eliminates the chore of throwing ice cubes into a searing hot oven. This creates an immediate mini steam-chamber that guarantees maximum oven spring and a deeply blistered, thin crust every bake.
Perfect For:
-
High-protein breakfast bases (topped with smashed avocado, poached eggs, or cottage cheese)
-
Low-carb-conscious sandwich lunches paired with sliced roast turkey, chicken breast, or grass-fed beef
-
Pre- or post-workout complex carbohydrate and clean protein fuel
-
High-protein savory snacks toasted with garlic oil and nutritional yeast
Why You’ll Love This Recipe:
-
No Specialized Banneton or Cloche Needed: The standard metal loaf pan shapes the loaf automatically, saving you from purchasing expensive rattan proofing baskets or heavy ceramic bakers. It simplifies handling high-hydration dough by taking the intimidation out of the final counter-shaping step.
-
Higher Protein Density Without Rubberiness: Vital wheat gluten fortifies the crumb strength while chia seeds bind moisture, keeping the bread soft and springy instead of dense or rubbery. You get double the macro benefits of ordinary bakery bread while retaining classic sourdough chew.
-
Foolproof Moisture Retention: Unlike round artisan boules that dry out quickly once cut, a pan loaf keeps its crumb enclosed and protected from rapid staling. It stays remarkably fresh and sliceable on the counter for days longer than freeform loaves.
Common Mistakes to Avoid:
-
Over-Proofing in the Pan: Letting the dough double past the rim causes the delicate protein matrix to collapse when the oven heat hits it; bake when the dome reaches 1 inch above the pan edge.
-
Skipping the High-Heat Steam Lid: Baking uncovered from start to finish sets the upper crust prematurely, completely stalling the dough’s rise and leading to a dense, gummy interior.
-
Slicing While Hot: Cutting into the loaf before it cools completely releases trapped steam, immediately collapsing the airy web of gluten into a gummy mess.
Required Equipment:
-
8.5 x 4.5-inch Heavy-Duty Metal Loaf Pan — Delivers rapid, even heat transfer to crisp the base and edges without scorching.
-
Second Identical Loaf Pan (or Oven-Safe Roasting Pan) — Inverts over the base loaf pan to trap natural dough steam for maximum oven spring.
-
Parchment Paper Sling — Prevents high-protein dough from sticking and allows seamless loaf removal without tearing.
-
Digital Kitchen Scale — Measures starter, flours, and water precisely to guarantee consistent hydration and crumb aeration.
Storage Instructions:
Store the fully cooled loaf wrapped in a clean linen towel or inside a brown paper bag at room temperature for up to 4 days; do not refrigerate, as the cold environment accelerates starch retrogradation and dries out the crumb. For extended high-protein meal prep, slice the entire loaf, place parchment squares between the slices, and store inside an airtight freezer-safe silicone bag for up to 3 months. Toast frozen slices directly in a standard toaster for 3 to 4 minutes to restore a fresh-baked crust.
Recipe Details
-
Preparation Time: 30 minutes active (plus 8 hours bulk fermentation & chill)
-
Cooking Time: 45 minutes
-
Total Time: 9 hours 15 minutes
-
Servings: 12 slices
-
Best Season for This Recipe: All-season
-
Total Calories (Per Serving): 145 kcal (approximate estimate)
An everyday, protein-fortified sourdough loaf baked straight in a home loaf pan for effortless slicing. It delivers bakery-quality blistered crusts and wild fermentation tang with balanced macros. Perfect for high-protein breakfasts, meal-prep lunches, and clean daily eating.
📝 Ingredients:
-
300g unbleached strong bread flour (minimum 12.7% protein content)
-
60g vital wheat gluten flour (pure plant protein booster)
-
250ml lukewarm filtered water (approx. 80°F / 27°C; unchlorinated)
-
80g active, bubbly sourdough starter (100% hydration, fed 4–6 hours prior)
-
20g finely ground chia seeds (adds structural fiber and healthy fats)
-
8g fine sea salt
Directions:
-
Autolyse & Starter Incorporation (Low Heat / Room Temp): In a large bowl, whisk the bread flour, vital wheat gluten, and ground chia seeds. Add the warm water and bubbly starter. Mix with a spatula until no dry patches remain. Cover with a damp cloth and rest at warm room temperature (75°F–78°F / 24°C–26°C) for 45 minutes to jumpstart gluten hydration.
-
Salt & First Stretch-and-Fold: Sprinkle fine sea salt evenly over the dough. Wet your hands, grab one edge of the dough, stretch it upwards, and fold it over the center. Rotate the bowl 90 degrees and repeat three times. Rest covered for 30 minutes.
-
Bulk Fermentation & Strengthening: Perform 3 additional sets of stretch-and-folds spaced 30 minutes apart. By the final set, the dough should feel silky, elastic, and hold a smooth domed surface. Cover and let ferment undisturbed at room temperature for 3 to 4 hours until increased by 50% in volume with visible bubbles under the skin.
-
Loaf Pan Shaping: Line an 8.5 x 4.5-inch metal loaf pan with parchment paper. Tip dough onto a lightly floured board, gently press into a rough 8×10-inch rectangle, fold the sides inward like an envelope, and tightly roll from bottom to top into a cylinder. Pinch the seam closed and transfer seam-side-down into the lined pan.
-
Final Rise: Cover loosely with an oiled wrap. Let rise at warm room temperature for 2 to 3 hours, or cold-retard in the refrigerator overnight (8–12 hours), until the dough crown rises approximately 1 inch above the rim of the pan.
-
Preheat & Steam Setup: Preheat oven to 450°F (232°C). If cold-proofed, bring the loaf directly from the fridge. Dust the top lightly with rice flour or bread flour, then slash a single, 1/4-inch deep longitudinal cut down the center with a razor blade or sharp knife.
-
Covered Bake (Steam Phase): Invert your second loaf pan over the dough pan to form a sealed dome. Slide onto the center oven rack and bake at 450°F (232°C) for 25 minutes. High-protein tip: Trapping the dough’s own moisture early prevents the high-gluten crust from hardening before achieving full volume expansion.
-
Uncovered Bake (Color & Crisp): Carefully remove the top pan. Lower the oven temperature to 410°F (210°C) and bake uncovered for an additional 20 minutes until the crust turns deep mahogany brown and the internal loaf temperature registers 208°F–210°F (98°C) on an instant-read probe.
-
Cooling: Lift the bread using the parchment sling and transfer directly onto a wire cooling rack. Cool uninterrupted for at least 2 hours before slicing.
Nutrition Facts (Per Serving – Approximate):
-
Calories: 145 kcal
-
Fats: 1.5g
-
Cholesterol: 0mg
-
Sodium: 265mg
-
Potassium: 82mg
-
Total Carbohydrates: 21g
-
Fiber: 5g
-
Net Carbs: 16g
-
Sugars: 0.5g
-
Protein: 11g
-
Calcium: 35mg
Notes:
-
Storage & Crisp Revival: Keep cut-side down on a wooden cutting board for 48 hours, or slice and freeze for long-term use. Toasting frozen slices at medium-high heat revives the crust’s crackle without making the center gummy.
-
Allergy Information: Contains high levels of wheat/gluten. Dairy-free, soy-free, nut-free, and 100% vegan.
-
Savory Flavor Boosts: Fold 1 tablespoon of dried Italian herbs, garlic powder, or 30g of toasted pumpkin seeds into the dough during the second stretch-and-fold for added flavor and micronutrients.