 ByYara
High Protein Chocolate Coconut Bars | Easy Low Carb Snack
Description
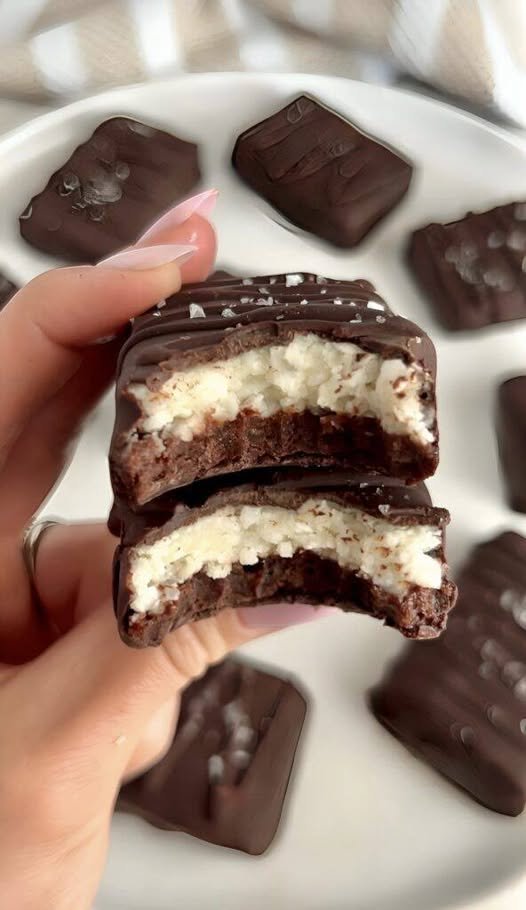
Imagine biting into a rich, chocolate-coated bar with a chewy, tropical coconut center that satisfies your sweet tooth while keeping your nutrition goals on track. These High Protein Chocolate Coconut Bars deliver that perfect candy-bar experience with a macro-friendly twist. Made with shredded coconut, vanilla protein powder, and a sugar-free chocolate topping, they’re naturally sweetened without any refined sugars. Whether you need a post-workout snack or a guilt-free dessert, these no-bake bars offer the indulgent flavors you crave with the high protein and low carb profile you want .
Can This Recipe Support Weight Loss Goals?
Absolutely! These bars are designed to support weight management through their high protein and fiber content. Protein helps promote satiety, keeping you feeling fuller for longer and reducing the urge to snack on less nutritious options. With approximately 11 grams of protein per serving and healthy fats from coconut and almond butter, each bar provides sustained energy without blood sugar spikes. The low net carb count (around 3-4g per bar) also makes them compatible with low-carb approaches that many people find helpful for weight management .
Does This Recipe Fit a High Protein Lifestyle?
Yes, these bars are perfectly suited for a high protein lifestyle. Each serving delivers approximately 11-14 grams of clean protein from whey isolate or plant-based protein powder, with only 3-4 grams of net carbs per bar. The combination of unsweetened shredded coconut, almond butter, and protein powder creates a nutrient-dense snack that supports muscle recovery and keeps you energized throughout the day .
My Personal Experience
-
Effortless No-Bake Preparation – I love that I don’t need to turn on the oven for this recipe. The entire process takes just 15 minutes of active prep time, and the fridge does the rest of the work .
-
Perfect Texture Balance – The contrast between the firm, chewy coconut center and the smooth, melt-in-your-mouth chocolate coating makes these bars feel like a gourmet treat. Chilling them overnight gives the best texture .
-
Customizable to Your Taste – I’ve experimented with different protein powder flavors and sweeteners, and the recipe handles substitutions beautifully. Vanilla protein powder gives a classic flavor, but chocolate works wonderfully too .
-
Meal Prep Hero – These bars are my go-to for weekly meal prep. I make a batch on Sunday, and they stay fresh all week, giving me a convenient high-protein snack whenever hunger strikes .
Perfect For
-
High Protein Snacks – Ideal for post-workout recovery or an afternoon energy boost without the sugar crash .
-
High Protein Desserts – Satisfy chocolate cravings while staying aligned with your fitness goals .
-
Low Carb and Keto Diet Plans – With only 3-4g net carbs per bar, they fit perfectly into ketogenic and low-carb lifestyles .
-
High Protein Breakfast – Pair with coffee for a quick, satisfying morning meal that keeps you fueled .
-
Meal Prep and On-the-Go – Grab one from the fridge for a portable, nutritious snack anytime .
Why You’ll Love This Recipe
-
No Oven Required – This no-bake recipe comes together in minutes using only a bowl and a pan, making it perfect for hot summer days or when you want to avoid heating up the kitchen .
-
Low Carb and Guilt-Free – Using unsweetened coconut and sugar-free chocolate chips keeps the carb count low while delivering the sweet, tropical flavor you crave .
-
Protein-Packed Satisfaction – Each bar delivers 11-14 grams of protein that helps keep you full and supports muscle recovery .
-
Clean, Simple Ingredients – No artificial additives or preservatives—just wholesome ingredients you can feel good about eating .
-
Versatile and Customizable – Easily adapt the recipe to your dietary needs by swapping protein powder types or adding nuts for extra crunch .
Common Mistakes to Avoid
-
Using Sweetened Shredded Coconut – Always choose unsweetened shredded coconut to keep net carbs low. Sweetened varieties add unnecessary sugars that completely alter the nutritional profile .
-
Skipping the Chill Time – Don’t rush the refrigeration step. The mixture needs at least 1-2 hours to firm up properly; otherwise, your bars will be too soft and fall apart when slicing .
-
Not Pressing the Mixture Firmly Enough – Press the coconut mixture very firmly into the pan using a spatula or the bottom of a measuring cup. Loose packing leads to crumbly bars that won’t hold together .
-
Overheating Chocolate – Melt chocolate chips in 20-30 second bursts in the microwave, stirring between each. Overheating can cause the chocolate to seize or become grainy .
Required Equipment
-
8×8-inch Baking Pan – Provides the perfect size for pressing the mixture into evenly thick bars .
-
Parchment Paper – Allows easy removal of the set bars and prevents sticking without adding extra oil .
-
Mixing Bowls – Separate bowls for dry and wet ingredients make combining them easier and more thorough .
-
Microwave-Safe Bowl – Essential for melting chocolate chips quickly and safely in 20-second intervals .
Storage Instructions
Store leftover bars in an airtight container in the refrigerator for up to 5-7 days. For longer storage, place bars in a freezer-safe container with parchment paper between layers and freeze for up to 3 months. When ready to enjoy, thaw in the refrigerator for a few hours or enjoy them cold for a firmer texture .
Recipe Details
-
Preparation Time: 15 minutes
-
Cooking Time: 0 minutes (no-bake)
-
Total Time: 1 hour 15 minutes (including chilling)
-
Servings: 8-12 bars
-
Best Season for This Recipe: All-season (no-bake makes it especially great for summer)
-
Total Calories (Per Serving): Approximately 190-230 kcal (varies based on ingredients used)
These high protein chocolate coconut bars deliver the perfect balance of indulgence and nutrition—a tropical escape in every bite!
📝 Ingredients
-
1½ cups unsweetened shredded coconut
-
½ cup vanilla or chocolate protein powder (whey isolate or plant-based)
-
½ cup natural almond butter (no sugar added; peanut butter works too)
-
⅓ cup sugar-free dark chocolate chips (for topping)
-
1 teaspoon coconut oil (optional, for melting chocolate)
-
1-2 tablespoons unsweetened almond milk (only if mixture is too dry)
-
¼ teaspoon sea salt (optional, enhances flavor)
Directions
Step 1: Mix Dry Ingredients
In a large mixing bowl, whisk together the unsweetened shredded coconut, protein powder, and sea salt until evenly combined. Break up any protein powder clumps with a spoon or whisk .
Step 2: Combine Wet Ingredients
In a separate bowl, stir the almond butter (or peanut butter) until smooth and glossy. If using, add the vanilla extract and mix well .
Step 3: Form the Dough
Pour the wet ingredients into the dry mixture. Stir with a sturdy spatula until a thick, sticky dough forms. If the mixture seems too dry and crumbly, add almond milk 1 tablespoon at a time until it holds together when pressed. The texture should be damp and slightly tacky .
Step 4: Press Into Pan
Line an 8×8-inch pan with parchment paper, leaving overhang on two sides for easy lifting. Transfer the mixture to the pan and press down very firmly using a spatula or the bottom of a flat measuring cup. Pack it tightly to ensure the bars hold together .
Step 5: Melt Chocolate Topping
Place sugar-free chocolate chips and coconut oil (if using) in a microwave-safe bowl. Microwave in 20-second bursts, stirring between each, until completely melted and smooth .
Step 6: Add Chocolate Layer
Pour the melted chocolate over the pressed coconut mixture. Spread evenly with a spatula to cover the entire surface .
Step 7: Chill and Set
Refrigerate for 1-2 hours (or freeze for 30-40 minutes) until the bars are completely firm and the chocolate has set .
Step 8: Slice and Serve
Lift the set mixture out using the parchment paper overhang. Place on a cutting board and slice into 8-12 bars using a sharp knife. Wipe the blade clean between cuts for neat edges .
Nutrition Facts (Per Serving – Approximate)
Based on 8 servings; values vary by specific ingredients used
| Nutrient | Amount |
|---|---|
| Calories | ~190-230 kcal |
| Total Fat | 13-14 g |
| Cholesterol | ~5-10 mg |
| Sodium | ~50-150 mg |
| Potassium | ~150-200 mg |
| Total Carbohydrates | ~10-12 g |
| Fiber | ~5-7 g |
| Net Carbs | ~3-4 g |
| Sugars | ~1-2 g |
| Protein | 11-14 g |
| Calcium | ~60-80 mg |
Notes
-
Storage: Refrigerate bars in an airtight container for up to 5-7 days. For longer storage, freeze for up to 3 months .
-
Reheating: These bars are best enjoyed cold or at room temperature. If frozen, thaw in the refrigerator for a few hours.
-
Allergy Notes: This recipe is naturally gluten-free. For dairy-free options, use plant-based protein powder and dairy-free chocolate chips .
-
Flavor Boosts: Add 2 tablespoons of cacao nibs or chopped toasted almonds for extra crunch. A pinch of cinnamon or vanilla powder adds warmth and depth .
-
Sweetness Adjustment: Taste the coconut mixture before pressing into the pan and add more sweetener if needed—liquid sweeteners work best for even distribution .
Frequently Asked Questions
Can I use a different protein powder?
Yes, whey isolate, casein, or plant-based protein powders all work well—just avoid powders with added sugars that would increase net carbs .
How many net carbs per bar?
Each bar contains approximately 3-4 grams of net carbs when using unsweetened coconut and sugar-free chocolate .
Why are my bars falling apart?
The mixture likely wasn’t pressed firmly enough into the pan or wasn’t chilled long enough—press very firmly and refrigerate for at least 1-2 hours .
Can I make these nut-free?
Absolutely! Substitute the almond butter with sunflower seed butter and skip any nut-based add-ins .
How long do these bars stay fresh?
They stay fresh for 5-7 days in the refrigerator or up to 3 months in the freezer when properly stored .
What can I use instead of sugar-free syrup?
Any zero-calorie liquid sweetener like allulose syrup, stevia syrup, or monk fruit syrup works perfectly .